Friday 30 August 2013

Giant Skittles Cupcake Recipe

I made this yesterday and WOW! A huge hit in my household. Everyone loved it. Take a look and try it yourself. It is very simple.
Let's get started.


Giant Skittles Cupcake
Ingredients
·         I used my strawberry cake recipe; you can find it here http://wymeakasworld.blogspot.com/2013/08/strawberry-flavoured-cake-recipe.html
·         I also used my vanilla frosting to decorate, which you can find here http://wymeakasworld.blogspot.com/2013/08/super-easy-vanilla-buttercream-frosting.html
·         Wilton Giant Cupcake cake pan
·         Skittles of your choice

Method
  1. ·        Preheat oven and bake the strawberry flavoured cake according to my recipe above. While the cake is baking make the frosting according to the recipe above.
  2. ·        Make sure cake is ready to be removed from the oven by inserting a toothpick or a knife it on the middle if it comes out clean then the cake is ready.
  3. ·        Cool the cakes in a pan on a wire cooling rack for about 30 minutes, then remove them from the pans and cool on wire racks until completely cooled.
  4. ·        Place the cake which is the bottom of the cupcake into the freezer for 10-15 minutes (this allows clean cutting and less crumbs). Remove the cake from the freezer and place on and place on your cake board or serving plate. Take a very sharp knife and cut about and 1 ½ inches from the edge of the cake all around in a circle. Very carefully scoop out the middle of the cake (save the scooping).
  1. ·        Carefully pour the skittles into your carved cupcake base, fill it up level with the base top.
  1. ·        Take your buttercream and squirt a little onto the skittles and place the top of the cake onto the base. This will seal the cake.

·        You are now ready to decorate anyway you would like.


I hope this has been as fun making as it has been for me. I love this cake and it’s great for surprises and guess what’s inside games.
  • As for the scooping you saved - Get a mug and layer the cake in the bottom, then jam, the cake, then jam, keep layering until you reach the top of the mug, now make a large swirl with your left over frosting. 

Grand Plum Pudding

Grand Plum Pudding
·      

             Prep time – 1 hour 10 minutes, cook time – 4 hours 10 minutes
·        Serves 12-14

Ingredients
1 cup sultanas
1 cup dried currants
1 cup walnut pieces
½ cup candied orange peel
2 tsp ground cinnamon
1 tsp ground cloves
1tsp ground nutmeg
1 tsp salt
½ tsp ground allspice
½ cup brandy or dry sherry
5 large eggs
1 cup sugar
1 cup milk
2 cups plain flour
2 cups dry plain breadcrumbs
1 cup unsalted butter, melted
1 tsp bicarbonate of soda

For The Creme Anglaise
1 cup single cream
2 eggs yolks
2 tbsp sugar
1 tsp vanilla extract

Method
1       Lightly grease an 8cup steamed pudding mold (a curved metal or ceramic mold with a lid) and ready a large stock pot filled with 3 inches of water.
2       Toss the raisins, currants, walnuts, candied peel, cinnamon, clove, nutmeg, salt and allspice together. Stir in the brandy (or sherry), and let sit while preparing the other part of the pudding.
3       Whisk the eggs and sugar, then whisk in the milk. Sift in the flour and whisk, then stir in the breadcrumbs followed by the melted butter. Stir in the soaking fruits and nuts mixture (including any excess liquid). Stir the baking soda in a small dish with 1 tbsp of warm water and stor this quickly into the batter. Scrape the batter into the prepared pudding mold and secure the lid.
4       Bring the stockpot with water up to a gentle simmer and place a cookie cutter or other similar ring to prevent it from touching the bottom of the pot. Cover the pot and steam the pudding for 4 hours, checking periodically that the water level in the pot remains the same. Remove the pudding from the pot, uncover and allow it to cool for an hour before turning out and serving with the Anglaise Creme.
5       For the crème Anglaise, heat the cream to just below a simmer in a small saucepan.

6       In a separate bowl, whisk the egg yolk and sugar together. Slowly pour into the hot cream wile whisking, then return the entire mixture to the pot. Use a wooden spoon and cook the custard on medium-low heat until it coats the back of the spoon, about 3 minutes. Strain the custard, cool it to room temperature, and then chill until ready to serve.

Thursday 29 August 2013

Strawberry Flavoured Cake Recipe

Strawberry Flavoured Cake Recipe


Ingredients
2 cups granulated sugar
1 (3oz) package strawberry flavoured Jelly or Jello
1 cup butter, softened
4 eggs
2 ¾ cups cake flour or all purpose
2 ½ tsp baking powder
1 cup whole milk, room temperature
1 tbsp vanilla extract
½ cup strawberry puree or a bag (pot) frozen strawberries (thawed)

Method
1.     Preheat oven to 175C. Grease and flour cake pans.
2.     In a large mixing bowl, cream together the butter, sugar and dry jelly until everything is light and fluffy.
3.     Beat in eggs, one at a time, mixing well after each one added.
4.     Combine flour and baking powder and stir into the batter alternately with the milk. Blend in vanilla and strawberry puree. Divide the batter evenly in cake pans.
5.     Bake 25-30 minutes or until an inserted knife comes out clean.
6.     Allow cakes to cool in pans on wire racks for at least 10 minutes before tapping out to cool completely. (If making a larger cake, cool in pans for longer).

Great recipe and always a favourite.

Giant Skittles Cupcake

Wow! I actually cannot believe that I have made this. I looked at cake images on the internet and saw a domed shaped cake with candy inside of it. I so wanted one. Could I make it?
I was very nervous trying this cake and didn't let the kids see what was inside. I wanted it to be a surprise. You usually get cream or fruit and even chocolate inside, but candy! Really? Is that even an option?
Well, let me tell you it definitely is and it's GOOD! I will post the recipe I used and how to pictures in my next blog, so stay posted.    


Wednesday 28 August 2013

Caramel Buttercream Frosting


Caramel Buttercream Icing
Ingredients
1/3 cup solid vegetable shortening
1/3 cup butter
2/3 cup caramel ice cream topping
1tsp pure vanilla extract
4 cups icing sugar

Method
1.     Cream shortening and butter together with mixer. Add ice cream topper and vanilla. Gradually add sugar, one cup at a time, beating well on medium speed, mixture will appear dry. Add milk and beat well on medium again.
2.    Keep icing covered with a damp cloth until ready to use.


Chocolate and Coconut Macaroon Bars

So yummy recipe, make sure you give these a try

CHOCOLATE & COCONUT MACAROON BARS

Ingredients
¾ cups (1 ½ sticks) butter, cut into chunks
2 cups all-purpose flour
½ cup granulated sugar
½ tsp. Salt
Topping
4 egg whites
¾ cups granulated sugar
½ cup all-purpose flour
1 bag (7oz) sweetened flaked coconut
10 oz. Semi-sweet chocolate chips

Method
1.   Preheat oven to 350
2.   Pulse butter, flour, sugar & salt mixture until it begins to form small lumps. Transfer into a pan and press evenly onto the bottom to form a base.
3.   Bake 15-17 minutes or until golden. While crust is baking, prepare the topping.
4.   In a large bowl, whisk together the egg whites and sugar until completely combined. Stir in flour and coconut.
5.   Sprinkle chocolate chips evenly over hot crust. Allow chocolate to melt and spread evenly over the crust with a spatula.
6.   Drop small spoonfuls of coconut mixture onto melted chocolate and spread evenly.

7.   Bake 25-30 minutes or until top is golden. Cool completely in pan and cut into bars.

Friday 23 August 2013

Miley cyrus smoking weed!


GOOD OR BAD???


What is going on with Miley Cyrus? Admitting to smoking weed!
So they cute Hannah Montana teenage popstar, role model to millions of children across the world, big beautiful eyes, long blonde hair and a cheeky smile. Dancing, singing and being a "good girl" working for Disney. Then BAM! No longer work for the popular kids channel and contract is up she is now found with a new hot single bumping, grinding and trying to twirk what she got.
A role model to children and teenagers is not what she is. One day she is the perfect child the next day she is a wild child and has a completely different bad girl image.
Is that a role model to all the underage fans she has? Blatantly telling everyone on a talk show where she was a guest that she has become good friends with Snoop lion because they smoke weed together so now have a lot in common. Miley has a serious heart condition which speeds her heart rate up and has been told she has to stay away from caffeine, weed and alcohol but she still continues to be stubborn and rebel against doctors and smoke and drink.
In my opinion she has confused lots of children allowing them to think it's okay to act this way. Don't get me wrong she has to grow up but she is wilding out and being a little overboard. Dressing half naked and trying to shake her booty. Smoking weed is not what I woild be boasting about Miley and I will be encouraging my children not to entertain you!
How do you feel about this? Are you going to debate or agree?

Thursday 22 August 2013

10 Inexpensive & Free Things To Do In School Holidays

Hey guys, if you are like me and have children that get super bored in their school holidays, then you will definitely something to come up with to help the boredom times.
We all hear, ''I'm bored'' all the time. I have to smile when I hear it because most children these days really do not know how good they have got it.
I have 5 children ranging in ages from 9 months to 14 years so our range of things to do has to be something for everyone. My house looks like a toy shop but still the kids are bored.
I know things can get a bit expensive, especially when you have a large family like I do. Another thing to take into account is that it's quality time the kids will rememeber, it's not always about big holdays and spending lots of money all the time. Well, here is a little list of things that you can do through the summer holidays. Check it out.


  1. Museums - Check out your local museums, most of them offer free entry and lots of free activities and events to do every week through the summer holiday season.
  2. Lemonade Stand or Bake Sale - Let the children make signs and give them a table to set up a stand, this is fun and helps them learn about money, buying and selling. You may have to front them $5-$10 to get them started.
  3. Movies or Cinema - Look at your local cinema/movies events as most of these franchises do cheap kids movies to watch a few times a week.
  4. Theme Days - You can create so much with this. You can choose a special color for the day to wear or characters, food and crafts. Pyjama day is a favorite in my house.
  5. Water Fights - When the sun is shining, splash, splash, splash. You can use the house, water balloons, buckets, bottles and lots more, they kids love it!
  6. Spring Cleaning Yard Sales - Have a sort out while cleaning as you go! Kids love this! Give them a box or trash bag to put all their unwanted toys in and when they have finished their rooms they can have a yard sale and sell their unwanted things. I spread this over 2 days, one for sorting and one for selling. Keeps them busy.
  7. Candy Scavenger Hunt - Buy a few larger bags of candy and have a scavenger hunt around the house and the backyard.
  8. Library - Check out what's going on at your local library as they have reading corner days and some even has crafts, they are usually free or very cheap.
  9. Garden Collage - (One of my favorites) Everyone go into the garden and find things from there. This could be sticks, pebbles, leaves and much more. Save cereal boxes or card and they can glue all the collected things onto these and make pictures, frames, tissue boxes, etc;
  10. Parks - Most of your local parks are running free events one day a week. Go to your park and have your face pinted, sit and create crafts, play with all their toys, chat and much more.
I hope these things help you and your family like they have mine. We have fun most days but we also have days in chilling out with just US. All of these things can be done as a family and that is the most important thing of all.

Wednesday 21 August 2013

Weird Strollers! REALLY!!!

Hi, to everyone in the world again. I just wanted to let you all know I am a stroller freak and have loved and owned lots of different pushchairs in the last 14 years. I have had chunky ones to basic ones,bright and dull colored ones. There's so many different options you need to take in account when choosing for your little ones. Some are very cheap, others are ridiculously over priced. I love looking around stores and browsing the net for them. I came across some crazy looking ones. Here are some of my favorite ones.


You're probably thinking what the hell! Right?
I know I thought the same thing but the more I looked at them I thought they were pretty cool. What features do they have though?
Personally I would love to design a pushchair. Would you?
Let me know your views.

Tuesday 20 August 2013

My 1st Fondant Cake

Are you terrified to try fondant and are only familiar with buttercream? That was ME a few days ago. I have used fondant before but only by making small decorations.
It was my daughter's 8th birthday yesterday and she saw a cake she wanted. I agrred to make it for her. Dreading the day I had to actually try and cover a 2-tier cake with fondant and make the decrations which were a bit more upscale to what I am used to making.
I started carefully and watched a lot of YouTube videos on how to do this. It began forming and looking like a cake. The finished result was amazing for my 1st fondant decorated cake. My daughter was over the moon and loved it.
Well guys here it is. What do you think of my 1st attempt?
I didn't want to cut the cake, I wanted to save it forever, but it was cut and everyone loved it.
If you are working with fondant for the 1st time and are nervous like I was then please take your time and find your own way to feel comfortable working with it. We are not professionals but certainly could bein time and with practice. Thank you for looking at my blog :)

Monday 19 August 2013

Wymeaka's World website love

Hi everyone, I have my website up and running!
I am new to all this so it's not the greatest but I am working hard everyday for it to be perfect and how I want it. My husband is getting frustrated with me as he is helping with it and I keep saying, ''Nooooo, I want it this way''. He really isn't impressed.
I know what I want and want it when I want it! Lol!
My website has a lot about cakes and recipes on at the moment, but it is actually about anything and everything, recipes, crafts, holidays, arguing or whatever you are in the mood for, even if you wanna chat, moan, bicker, debate I am here. Stop by and show me some love xxx
www.wymeaka.com

Sunday 18 August 2013

Wet Pineapple Crush Cake Recipe


I love this cake and made it up myself.
I had a taste for cake and pineapples. So I made this.
This is a cake I bake in my cake pan that has a lid and I just cut it up and serve it from there.


Ingredients
Butter Cake Recipe http://wymeakasworld.blogspot.com/2013/08/butter-cake-recipe.html
Butter Cream Frosting http://wymeakasworld.blogspot.com/2013/08/super-easy-vanilla-buttercream-frosting.html
Canned Pineapple Chunks

Method

  1. Make the butter cake accoding to the recipe but substitute the milk for pineapple juice out of the can of pineapples but save a little.
  2. Make the frosting according to the recipe
  3. When the cake has baked and cooled. Smother the frosting quite thickly on the top of the cake and poke a few holes in the cake using a toothpick and pour on the rest of the juice from the can. 
  4. Crush up the pineapple (I leave mine quite chunky) and pour on top.
  5. Pop this in the fridge for about an hour and it's ready to be served.
Let me know if you enjoy this cake as much as my family does x

Saturday 17 August 2013

Giant Rainbow Cake


GIANT Rainbow Cake Recipe

One of my favorites, but is a lot of work! Colorful and crazy though!

INGREDIENTS

  • Make 2 batches of this for 4 cakes - Super Easy White Cake Recipe which can be found here http://wymeakasworld.blogspot.com/2013/08/super-easy-white-cake-recipe.html 
  • Wilton Gel Food Colors of your choice or regular food coloring
  • Buttercream Frosting can be found here http://wymeakasworld.blogspot.com/2013/08/super-easy-vanilla-buttercream-frosting.html
  • Decorations of your choice.


Method

  1. Preheat the oven and prepare cake pans with non stick cooking spray.
  2. Prepare 2 lots of cake batter to make 4 cakes.
  3. When cake batter is prepared, divide into 4 large bowls and choose your colors and mix each bowl a different color.
  4. Pour each bowl into a differnt pan, keeping them seperate so the colors do not mix.
  5. Bake cakes for 30-35 minutes or until a toothpick inserted comes out clean. Transfer cakes to a wire cooling rack and let cool completely. 
  6. When cooled, trim all cakes level and amooth buttercream thickly and evenly on each and later the cakes in the order of colors you want them to be.
  7. when they are stacked. Cover the stack of cakes with buttercream and smooth and decorate how you wish.
  8. Cut the cake and surprise, it's a rainbow
The thing I love about this cake is that each layer is a whole cake not cakes halved. If you never want your cake to end, this is the one you need to bake. Let me know what your results are.


Super Easy White Cake Recipe

Hi everyone. I love to use this recipe when I make colored cakes or just when I want a virgin (white) look. I acquired this recipe when I lived in America. One of my very good friends shared this and said it was ok to share with the world, make good use of this one. It's special xxx

*This recipe makes enough cake batter to fill 2 x 9inch cake pans.

Ingredients
2 cups all purpose or plain flour
2 tsps. baking powder
1/4 tsp salt
12 tbsp (1 1/2) sticks butter or margarine, softened
1 1/2 cups granulated sugar
3 tsps vanilla extract
6 large egg whites
3/4 cups milk

Method

  1. Preheat your oven. Prepare cake pans with non stick cooking spray.
  2. Mix flour, salt and baking powder in a bowl and mix it well.
  3. With an electric mixer, mix butter and sugar for about 5 minutes until fluffy and creamy.
  4. In a seperate bowl whisk together the egg whites milk and vanilla until just combined.
  5. Add together a little bit of each mixture at a time until it is all combined.
  6. When mixture is all combined, mix for a further 3-4 minutes with electric mixture.
  7. Divide batter equally into each cake pan and let sit for about 5 minutes.
  8. Bake for 30-35 minutes or until a toothpick inserted comes out clean.
  9. Cool in pans on wire racks.

How To Make Piggy Cupcakes


These are just too cute!
I made these with cupcakes and fondant on top. I never really use fondant so do not have much experience. It was my daughter's best froend's birthday and she loves pigs so I created these. She absolutely loved them!

Ingredients
I used the butter cake recipe for the cupcakes which you can find here http://wymeakasworld.blogspot.com/2013/08/butter-cake-recipe.html
Pink fondant
A small tube of black, white & pink buttercream frosting
Icing or confectioners Sugar (for dusting)


Utensils Needed
Rolling Pin
Round cutters (the size of the tops of your cupcakes)
Star shaped cutter
Cupcake or muffin sized pan, to bake cupcakes
Wax paper or greaseproof paper

Method
  1. Make the cupcakes following the butter cake recipe and allow them to cool on a wire rack.
  2. When cupcakes are cooled, place them in the freezer for about 5 minutes (this creates easier cutting and less crumbs for the next step).
  3. Remove them from the freezer and trim the tops off of each cupcake it is level with the top of the cupcake case.
  4. Dust you surface and rolling pin with sugar and roll your fondant out, to about 3mm thick. Cut out as many rounds you need with the round cutter and place each one on the was paper.
  5. Next use your star cutter, using the point of one of the stars cut out 2 ears for each round cut out. On half of the ears bend on very carefully and place all the ears on the wax paper.
  6. Now for the nose. The left-over fondant needs to be rolled into a ball and take some chunks from this, roll into a ball, press the ball into a chunky rectangular shape and poke two dents into it with a toothpick and also place these on the wax paper
  7. Place a little of the white buttercream on your cupcake and put a round on top. This is the pigs face.
  8. Now, place some buttercream on to the back of two ears one at a time and place a bent ear and a normal ear near to the top of the pigs head.
  9. Put buttercream on the nose and place this in the centre of the face.
  10. Use your black buttercream and draw oval shapes for the eyes and put a tiny white dot of buttercream on top of this.
  11. Make a mouth shape with you pink buttercream and fill in the little holes in the nose you created.
These are all done.
There seems like there is a lot of steps but after you have made these the first time you will say, ''Wow that was easy''.
I hope these were as fun to make for you as they were for me.

10 Tips For Baking Cupcakes


Hello again everyone. More about cupcakes. I am not a professional but I have been doing this for quite a while. I have a few tips to help you if you are a little stuck and if you have any other problems about cupcakes please let me know as I may be able to help.


  1. Always pre-heat your oven as this allows the cupcakes to cook at the same temperature.
  2. If you are not using liners or cases to bake in, make sure you a good brand of non-stick cooking spray.
  3. Make sure you measure all ingredients correctly, never use short cuts or just can't be bothered.
  4. If you are using ingredients from the refrigerator, allow them to become room temperature before using.
  5. Never over-beat your cupcake batter.
  6. Use an ice cream scoop to fill your cases as this is less mess, and never over fill your cases, about 2/3 full is fine.
  7. When the cupcake batter is in the cases, let them sit on the counter for about 2-5 minutes to let the batter settle, this will help them to be evenly cooked and dome nicely.
  8. Set a timer! I always check mine after about 10-12 minutes, you can insert a toothpick into one of the cupcakes and if it comes out clean (no runny batter) then you are good to go! Take them out, they are ready.
  9. Take them out of the cupcake or muffin pan and place them on a cooling rack, I make this a MUST as it helps them to stay light and fluffy and allows them to cool properly.
  10. Wash up as you go! If not you will never want to clean the mess up!

If hope this helps you. If you are a newbie at making cupcakes. Print this out! Pin it up in your kitchen and you will NEVER forget!
See you all soon xxx

Friday 16 August 2013

Oh! So! Pretty Cupcakes


These cupcakes were made for a school fete. I was asked to do a cupcake stall. I made 100 mixed colored cupcakes the night before and they were so beautiful. I wanted to box them and keep them forever!
Really I should of made more as I sold out of everything in 15 minutes. Whoa! What's happening. As soon as I set up they were selling.
So pretty and beautiful, soft and fluffy. I made the decorations myself from fondant so they were also edible.
It was such a hit I have been asked to return and do another event at christmas time. Think I will be making double the amount!
Get creative and bake, bake, bake.


Thursday 15 August 2013

Ferrero Rocher Cake Recipe

This is one of my favorite cakes to make, very easy but tastes delicious. I like to bake this cake in a bundt pan, but it can be baked in any cake pan.


Ingredients
To make the cake  I use my butter cake recipe, you can find that here http://wymeakasworld.blogspot.com/2013/08/butter-cake-recipe.html
Hazelnut chocolate spread
Digestive Biscuits

Method

  1. Preheat oven to 400F. Spray the cake pan with non stick cake cooking spray.
  2. Prepare the Butter Cake Recipe, and pour mix in cake pan.
  3. Bake 35-40 minutes or when a toothpick inserted comes out clean.
  4. Leave cake in pan and cool on a wire cooling rack.
  5. When cooled, melt the chocolate spread and our it around the edges of the bundt cake. 
  6. Crush the biscuits and sprinkle all over the chocolate.
Your cake is now complete. Slice, serve and enjoy.
*If you are not using a bundt cake pan, just decorate the cake by pouring chocolate all over it and then sprinkling the biscuits over the chocolate.
*If you are allergic to nuts, use regular chocolate spread instead of hazelnut spread (not much difference).

For more recipes and food related pictures and how to's click here


Butter Cake Recipe

This is a basic butter cake recipe that can be used so many ways


Ingredients
2 cups (3 1/2) sticks butter, room temperature
2 1/4 cups granulated sugar
5 eggs
1 tsp vanilla extract
3/4 tsp almond extract
3 cups all purpose flour
3/4 tsp baking powder
1/4 tsp salt
3/4 cups milk

Method

  1. Preheat oven to 400. Spray cake pan with non-stick cooking spray.
  2. In a large bowl, cream butter and sugar until soft and fluffy. Add eggs, mixing well after each one added then mix in vanilla and almond extracts and milk.
  3. In another bowl mix flour, baking powder and salt.
  4. Add flour mix with butter mix and combine until completely blended.
  5. Pour in prepared pan and bake for 35-40 minutes or until an inserted toothpick comes out clean.
  6. Place cake pan on a cooling rack and cool.

Wednesday 14 August 2013

Super Easy Vanilla Buttercream Frosting

You will love this recipe. 10 minutes is all it takes :) Makes about 24 cupcake servings

Ingredients
1/2 cup butter, sofetened
2 tsp vanilla extract
4 1/2 cups icing or confectioners sugar
5-6 tbsp 2%milk

Method

  1. In a large bowl, beat butter until creamy.
  2. Beat sugar, vanilla and enough milk to the consistency you need. If using an electric mixer be careful when beating the sugar as it is messy.

Tuesday 13 August 2013

Polka Dot Cake

Do you love unusual cakes? Well here is on. I was browsing the net and saw a photo of a polka dot cake and gave it a try. Here is my first Polka Dot cake.


I made it! I realised after we cut it that I had to place the dough balls correctly, but either way this was great and all the kids loved it!
This is very easy to make but quite a long drawn out process. Some of the steps can be done the day before actually baking the cake.
The cake batter is prepared in the cake tin and then you place your colored dough balls (cake pops) and bake as normal. I thought that because the cake pops were already cooked they would burn when the cake was being cooked but they didn't so I don't know what scientific thing happens there lol.
You do not have to do a double layer cake either, just a single layer will be just fine. I was feeling brave that day and the kids even decorated it.

Absolutely delicious and very different, any color and pattern can be used.
What would be your favorite colors?
I will be posting step-by-step recipe on my new up and coming website within the next few weeks, check it out at http://www.wymeaka.com


Kolcraft 2-in-1 Preferred Position Bassinet


I bought this bassinet for my 5th child as I had gotten rid of everything after my 4th child thinking we would not be expanding our family anymore. It was an absolute dream, it fulfilled all of my baby's needs. My little boy became ill so the incline sleeper was perfect as he couldn't sleep flat. It came with a little toy mobile and a battery operated electronic unit that played nature sounds, lullaby's and even vibrated. My favorite feature was the dim night light which didn't wake my husband up when baby needed feeding or was just unsettled. The base has a huge storage basket which fitted everything in and more. Very roomy for baby and all fabrics can be removed for easy washing. So want another baby just to use it again lol. Did you have a bassinet like this?

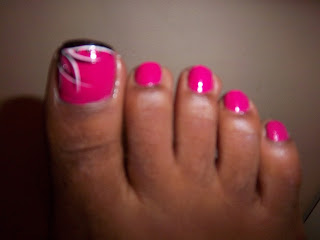
How to Pink Toe Nail Art


Omg! I was in such a rush to get out the house in the summer and as I put my shoes on I screamed at what I saw. Chipped and peeling nail polish! I thought, ''I can't go out like that.'' Quick! I ran upstairs grabbed the nail case and within 3 minutes I created this. I really should of let the pink dry before I painted the black and white but it dried perfect and I also got compliments.
You will need:

  • Nail polish of your choice
  • Black & white nail art pens or polish with thin striping brushes
  • Clear top coat
  1. Paint all of your toe nails one color. Let dry.
  2. Take the black nail art pen and paint the very tip of your toenail at the top, from the outer corners pull the brush towards the middle of the nail in a striped/lined pattern. Let dry.
  3. Next take the white nail art pen and outline the black lines you did in the previous step. Let dry.
  4. Paint with top coat and you are done.
But if you are in a rush and you have mastered this design you can do it an about 3 mins and put the top coat on later.
Now It's time to strut your stuff and show them toes off. Wiggle, Wiggle lol.